In today’s world of rapidly evolving technologies, organizations are facing two huge challenges “how to handle” and “how to protect a vast amount of data.” This is where Splunk comes in handy. This SIEM helps businesses collect, analyze, and monitor log files. It has become a necessity now as it gives credible information to companies. At the same time, Okta is a popular identity and access management (IAM) solution.
Integrating Splunk with Okta helps organizations streamline user authentication, audit logging, and access control. So, Splunk and Okta are two powerful tools that can greatly improve the security and visibility of an organization’s systems and applications. Today, let’s look at the benefits and steps involved in setting up Splunk in Okta.
According to Okta, by leveraging the Okta Splunk integration, you can experience the following benefits:
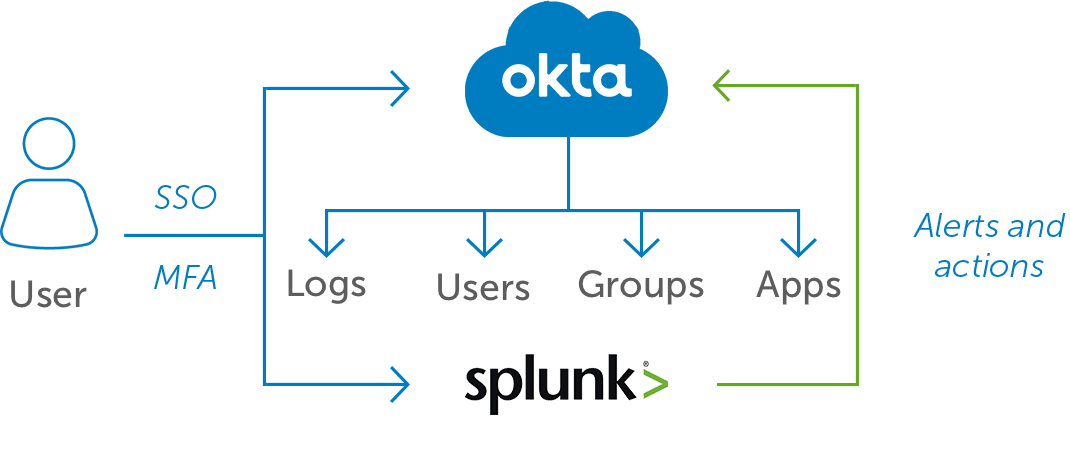
Source: Okta
Okta & Splunk Integration: Step-by-Step Guide
Configuring Splunk in Okta involves several important steps. Here’s a step-by-step guide to help you through the process. Before you begin, make sure you have a valid Splunk account with administrative access to configure Okta integration.
Step 1: Adding the Splunk App to Okta
To start the Okta Splunk integration process, you should first add the Splunk app to Okta. The Splunk app is a “connector” between Okta and Splunk that enables data transfer between these two systems. To manually add the Splunk app to Okta, follow these steps:
- Log in to your Okta admin account and navigate to the Okta Admin Dashboard.
- Click the Applications tab and go to Browse App Catalog.
- Search for “Splunk” in the Okta Integration Network or choose Create New App.
- Click Add and fill in an Application label (it is a name for the application (e.g., “Splunk 1”), and insert your Splunk URL.
- Click Next to proceed, and now, it’s time to configure Okta SLO.
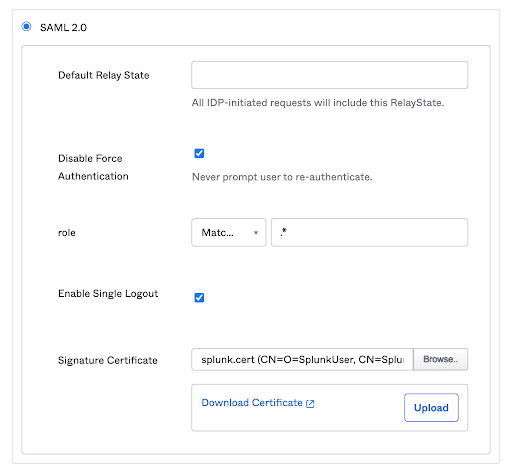
Step 2: Configuring Okta Single Logout (SLO)
Now, let’s configure the Okta Single Logout (SLO). It allows you to log out of Okta and other applications simultaneously with a single action. Enabling SLO is important as it ensures that you are securely logged out of both Okta and Splunk when they initiate the logout process. Here’s how to configure Okta SLO:
- Access the Splunk app within Okta and navigate to the Sign-On tab.
- Enable the Single Logout option and add your splunk.cert file in the Signature Certificate field.
- Save the configuration changes.
Step 3: Populating Splunk with Okta’s Metadata
Before we switch to the Splunk instance, do the following in Okta Application settings:
- Go to the Sign-On tab.
- Click the View Setup Instructions button.
- Keep this page open, as it contains information needed to configure Splunk.
Now, switch the Splunk instance to Configure Splunk for SAML SSO:
- Access your Splunk instance and log in as an administrator.
- Navigate to the Settings menu and select SAML Single Sign-On.
- Click Configure SAML.
- Then, you would need to specify the identity provider (IdP) metadata by uploading an XML file.
- Next, all the fields should be filled in automatically. Make sure the following details are correct. If not, fill them in from the Okta setup instructions:
- Entity ID (you can set it to splunk-companyname).
- Single Sign-On (SSO) & Single Log Out (SLO) – these links will be the same except for the /sso/saml or /slo/saml at the of the URL.
- IdP certificate path.
- Save the configuration.
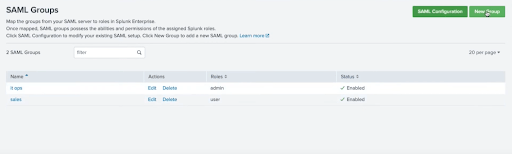
Step 4: Mapping Okta Groups to Splunk Roles
Mapping Okta groups to Splunk roles ensures effective access control within Splunk based on what Okta group a user belongs to. By configuring this mapping, you can automatically assign appropriate roles to users when they authenticate through Okta. Follow these steps to map Okta groups to Splunk roles:
- In the Splunk app, when you already chose SAML as your authentication method, you should be able to access SAML Groups.
- When you click New Group, you can assign a Group Name and corresponding Splunk Roles (e.g., admin).
- At the time of login, SAML users are added to Splunk. A user’s data (email and name) will be sent from Okta to Splunk as SAML attributes.
- This way, users log in to Splunk from Oktasemalessly using their Splunk accounts, and their Splunk roles are also mapped depending on the groups where they’re added.
When users are added or removed from Okta groups, their access privileges in Splunk are automatically adjusted. By maintaining consistent access controls across both systems, organizations can enhance security and improve overall system efficiency.
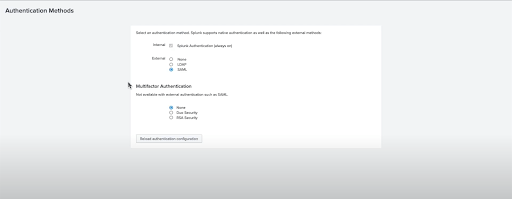
Step 5: Enabling Additional Security Features (Optional)
You can set up additional security features, such as Multi-Factor Authentication (MFA) and adaptive access policies, according to your organization’s requirements. For this, do the following:
- Go to the Okta Admin Console.
- Navigate to Splunk in Applications.
- Click the Sign-On tab.
- Scroll down to the Settings section.
- Enable MFA for the Splunk app by selecting the desired MFA factors from the available options.
Remember to communicate the MFA setup to the users within your organization. Inform them about the additional security measures and explain how to set up and use them.
Step 6: Monitor and Maintain
As with any solution, maintenance is essential. The Splunk Okta integration isn’t an exception. First of all, ensure the security aspect. For this, monitor logs and system performance. The easiest steps would be to check the following factors:
- Any suspicious activity, unusual patterns, some abnormal logins, etc.
- Always remember to inspect your system’s resource usage. The high values of CPU, memory, and disk space usage might be indicators of some threat actor activity.
Other important steps would be to continuously update and patch both of your systems to avoid any possible vulnerabilities and bugs. And finally, if you make any changes to your Splunk Okta integration and setup, make sure to test it and troubleshoot if needed.
With the ever-growing cyber threat landscape, progressive organizations are searching for ways to boost their cyber defense capabilities and timely detect emerging threats. Managing multi-tenant infrastructure and analyzing large pools of data coming from disparate sources can pose a daunting challenge that requires additional SOC team time and effort, especially for organizations that operate diverse SIEM or EDR tech stacks. SOC Prime Platform for collective cyber defense offers a feasible solution by enabling simplified detection content translation for 28 SIEM, EDR, and XDR technologies, including Splunk.
Sign up for SOC Prime Platform and make the most of 12K+ Splunk Alerts and Queries available in the world’s largest threat detection marketplace and instantly convert Sigma rules to the Splunk format backed by the power of augmented intelligence with Uncoder AI.
Splunk clients can also rely on SOC Prime CCM App for Splunk to continuously stream new rules and rule updates from the SOC Prime Platform to both cloud or on-premises Splunk instances. The app is available right from Splunkbase.